
Hardie Plank cladding is a durable, low-maintenance fibre cement exterior siding, popular for its versatility and resistance to weather, pests, and fire. Ideal for modern and traditional designs, it offers a long-lasting, attractive solution for exterior walls, enhancing both functionality and aesthetic appeal.
1.1 Overview of Hardie Plank Cladding

Hardie Plank cladding is a fibre cement exterior siding renowned for its durability and versatility. Composed of Portland cement, milled sand, cellulose fibres, and water, it offers excellent resistance to weather, pests, and fire. Its natural texture and variety of finishes make it a popular choice for both modern and traditional architectural designs. Hardie Plank cladding is lightweight yet robust, providing a long-lasting solution for exterior walls. It is widely used by homeowners, architects, and builders due to its low-maintenance requirements and aesthetic appeal. This cladding system is designed to withstand harsh environmental conditions, ensuring a durable and attractive facade for buildings.
1.2 Benefits of Using Hardie Plank Cladding
Hardie Plank cladding offers numerous benefits, including exceptional durability, low maintenance, and resistance to weather, pests, and fire. Its fibre cement composition ensures long-lasting performance, while its versatile design suits various architectural styles. The cladding is lightweight yet robust, making it easy to install and handle. It provides a natural, attractive finish that enhances curb appeal. Additionally, Hardie Plank cladding is resistant to warping and cracking, maintaining its appearance over time. Its low-maintenance requirements and durability make it a cost-effective solution for exterior walls. With a wide range of finishes and textures, it caters to diverse aesthetic preferences, ensuring a beautiful and enduring facade for any building.
Tools and Materials Needed for Installation
Key tools include drills, saws, measuring tapes, and levels. Materials required are weatherproof nails, sealants, and flashing for a secure and weather-tight installation process.
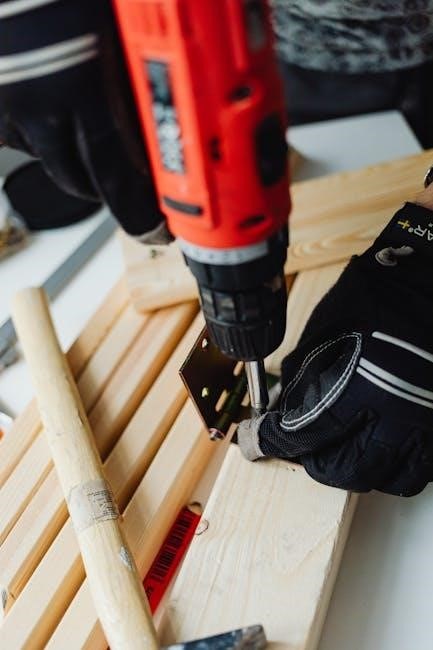
2.1 Essential Tools for Hardie Plank Installation
The installation of Hardie Plank cladding requires specific tools to ensure a professional and durable finish. A circular saw or hand saw is necessary for cutting the planks to size. Drill bits are used to pre-drill holes for fixings, while a spirit level ensures proper alignment. Measuring tapes and pencils are essential for marking accurate cuts and positioning. A hammer or nail gun is required for securing the planks, and sealants like silicone are applied to joints for weatherproofing. Safety gear, such as gloves and goggles, is also crucial during the process. Having these tools ready ensures efficiency and precision in the installation.
2.2 Required Materials for the Project
The installation of Hardie Plank cladding requires several key materials to ensure a successful and long-lasting result. Fibre cement planks are the primary material, available in various sizes and textures. Weatherproof barriers, such as breathable membranes, are essential to protect the structure from moisture. Fixings, including galvanized or stainless steel nails or screws, are necessary for securing the planks. Sealants like silicone are used to seal gaps and joints for weather tightness. Flashings and trims are required for edges, corners, and joints to ensure a watertight seal. Additionally, safety materials, such as gloves and goggles, are needed for proper installation. These materials ensure durability and protection for the cladding system.

Preparation for Installation
Proper preparation ensures a smooth installation process. Check the structure for damage, clean the surface, and ensure all necessary tools and materials are ready. Safety gear, like gloves and goggles, is essential for handling fibre cement planks, which should be stored on edge to prevent damage.
3.1 Site Preparation and Safety Measures
Before starting, inspect the site for structural integrity and clear debris. Ensure the surface is clean and dry for proper installation. Wear protective gear, including gloves and goggles, to handle fibre cement safely. Hardie Plank cladding should be carried on edge to prevent damage. Store materials in a dry, secure area to avoid exposure to moisture. Check for any existing damage on the walls and address it before proceeding. Proper ventilation is essential when cutting or drilling fibre cement products. Follow all safety guidelines to ensure a secure and efficient installation process.

3.2 Handling and Storage of Hardie Plank Cladding
Hardie Plank cladding must be handled with care to prevent damage. Always carry planks on their edge, never flat, to avoid bending or cracking. Avoid dragging planks across surfaces, as this can cause scratches. Store cladding in a dry, well-ventilated area, protected from direct sunlight and moisture. Keep planks elevated off the ground to prevent water exposure. Ensure the storage area is secure and stable to avoid accidental damage. If storing for extended periods, cover the planks with a breathable material to shield them from the elements. Proper handling and storage ensure the material remains in optimal condition for installation.
Step-by-Step Installation Process
Start with a level base, ensuring proper alignment. Secure Hardie Plank cladding using approved fixings, spacing them evenly. Maintain recommended gaps between planks for expansion. Finish neatly, following manufacturer guidelines for a professional result.
4.1 Starting the Installation
Begin by ensuring the surface is level, clean, and dry. Check all walls for plumb and alignment. Start installation from the bottom course, securing the first plank with approved fixings. Use a spirit level to ensure proper alignment. Maintain a 6mm gap at the bottom for expansion. Avoid face-nailing planks; instead, fix them through the nailing strip. Ensure fixings are placed 15mm from the edges and spaced evenly. Properly align each plank with the previous one, ensuring a smooth, even surface. Follow manufacturer guidelines for spacing and fixing patterns to guarantee a secure and visually appealing installation.
4.2 Fixing the Cladding Planks
When fixing Hardie Plank cladding, ensure planks are securely fastened using approved fixings. Place fixings 15mm from the edges and space them evenly. Use a spirit level to maintain alignment. Avoid face-nailing; instead, fix through the nailing strip. Ensure a 6mm gap between planks for expansion. Start from the bottom, working upwards, and secure each plank tightly. Use recommended fasteners to prevent damage. Properly align each plank with the one below to ensure a smooth finish. Follow manufacturer guidelines for fixing patterns and spacing to achieve a secure and visually appealing installation.
4.3 Finishing the Installation

After securing all planks, inspect the installation for alignment and gaps. Seal any gaps between planks and joints using a high-quality exterior sealant. Ensure all edges and corners are properly sealed to maintain weather resistance. Inspect fixings to confirm they are correctly positioned and not over-tightened. Clean the surface of any debris or dust. If painting is required, allow the cladding to weather for the recommended time before applying paint. Finally, conduct a thorough inspection to ensure all planks are securely fixed and the installation meets manufacturer guidelines. Address any minor issues promptly to ensure long-term performance and durability of the cladding system.
Troubleshooting Common Issues
Address gaps by rechecking plank alignment and spacing. Ensure fixings are correctly positioned and not overtightened. Refer to manufacturer guidelines for resolving weather tightness and structural issues.
5.1 Addressing Gaps and Alignment Problems
Gaps and alignment issues in Hardie Plank cladding can arise from improper installation or uneven surfaces. To address these, inspect the planks for correct spacing and ensure they are flush. Use shims or adjust the battens to align planks properly. Verify that starter boards are level and securely fixed, as misalignment here can propagate issues. If gaps persist, check for warping or uneven walls and address these before proceeding. Always refer to the manufacturer’s guidelines for spacing recommendations and ensure planks are not butted too tightly, as this can cause buckling. Proper alignment ensures a seamless, weather-tight finish.
5.2 Resolving Fixing-Related Issues
Installing Hardie Plank cladding is a rewarding project that enhances your home’s durability and curb appeal. Always follow manufacturer guidelines and safety protocols to ensure a successful installation. Regularly inspect and maintain the cladding to prevent damage and extend its lifespan. For optimal results, use recommended tools and materials, and consider consulting professionals if unsure. Proper handling and storage of planks are crucial to avoid damage. Finally, ensure all fixings are secure and evenly spaced to maintain structural integrity and warranty validity. By adhering to these tips, you’ll achieve a professional-looking finish that withstands the elements for years to come.